Are you ready to learn how to start a blog the right way?
Hey, there future blogger!
You did it!
You’ve taken the first step towards making your dreams come true.
No more debating, no more excuses, and no more doubting yourself.
You’ve finally made the decision to start your own website. That’s great! And you should feel really proud.
But now what?
You have no idea where to start. Believe me, I get it!
Because when I started out, I didn’t know the first thing about how to start a blog.
In fact, my computer skills were very limited in
And when I was learning how to start a blog, do you know what I needed the most?
It’s the same thing that you need right now…HELP! Lots and lots of help
You don’t need technical jargon and false expectations. You need comprehensive, realistic, plain and simple help.
Well, you’re in luck! Because simple and comprehensive is what I do best! (smile).
I’m not going to give you any misleading promises that you can learn how to start a blog in 10-15 minutes. Nope, I won’t do it!
Because you’ll soon find out, just like I did.
That unless you already have some idea of what you’re doing, then it ain’t gonna happen!
In fact, it took me a few days to set up my blog. (But, full disclosure, I do tend to be a bit of a perfectionist. And I get hung up on details. So that is something that I work on with myself.)
But what I’ve learned is, don’t focus on being perfect when you’re a beginner. Just make sure it’s good enough!
Now as we dive deeper into how to start a blog, you’ll see that the actual sign-up process is simple, especially when using
It’s everything that comes before and after the sign-up that requires effort.
So now I’m going to show you an easy-to-follow guide on how to start a blog using WordPress and Bluehost.
And don’t worry if you don’t know what that means, because you will once we’re done.
Ready? Let’s begin.
Table of Contents
How To Start A Blog

1. Figure Out Your Blog Topic
Before you begin your blogging journey, there are some decisions you need to make.
First and foremost, what will you write about?
Choosing a blog topic can be harder than you may think.
You’ll hear a lot of talk in the blogging community about finding your niche.
What that really means is, just narrowing down the focus of your topic to attract a particular reader.
In other words, your blog needs to solve a specific problem for a specific audience.
When I started my blog, I wanted to talk about personal finance. But that is a very general topic.
So within the topic of personal finance, I had to get more specific about who I was going to help.
And my strengths are, helping people in debt to improve their mindset about how they use money. While also providing them with ways to earn more and save more money.
Although, I could still niche down even further as I learn more about my audience and who my writing appeals to the most.
For example, I could go in the direction of helping professional women obtain financial independence by starting a blogging business.
So keep that in mind, that it is possible for your topic to evolve over time.
But for now, here are some great tips to help you begin to narrow down your audience.
How to find your Niche?
Ask yourself this:
What do you enjoy doing?
This is one of the first decisions you must make when learning how to start a blog the right way.
Your blog topic should be something that you are passionate about. And that you enjoy talking about all the time.
Because that is exactly what you’ll be doing!
Also, you could ask yourself, what are you skilled at doing?
If you have a lot of experience in a particular area, then you can share that knowledge to help or teach others.
Just make sure that you won’t get bored with your topic. Because, if you get bored then your blog won’t survive.
Who does your blog help?
This is your target audience. They should read your blog posts and feel that it was written just for them.
Your blog and your posts should answer the reader’s burning questions and solve their problem in some way.
For instance, you could be a mom who teaches new moms successful tips for surviving life with a newborn.
And knowing who you’re writing for is an important step in the process of how to start a blog.
Is there a demand for your niche?
Okay, so you can’t learn how to start a blog without making sure there is a real demand for your niche.
It’s best to choose a niche with a large audience.
That way you know the topic is sustainable. Also, if the audience is too small, then it may be harder to monetize (make money from) your site.
Here are a few juicy topics that people never grow tired of:
- Money, such as…
- How to make money
- How to Start a Blog or Business
- Health, such as…
- Fitness/yoga
- Wellness/Healthy living
- Family, such as…
- Kids activities
- Relationships, such as…
- Marriage/Divorce
You’ll definitely need to do some detective work.
No matter which topic you choose, it’s smart to check out other blogs in that niche to see what’s working for them.
You can do a Google search for blogs on your topic. Or you can use a site like Alltop to search for popular blogs related to your niche.
Another way to check if your niche is viable is to search on Facebook.
If you belong to any groups, then type the keywords related to your subject in the search this group bar.
This will show you if there are lots of questions related to that topic.
And don’t worry or get discouraged if there are tons of other blogs in your niche.
Just focus on helping your readers to solve their burning problems.
Then, bring your own style and expertise to your writing. After all, nobody else can do you, but you!
2. Choose A Domain Name (Name for your blog)
So now that you’ve decided on your niche topic, what will you name your blog?
This can be fun, or it can be a headache if you let it become one.
Your domain name is the name that you give to your blog.
It’s your unique identity on the internet.
And it’s what readers will type into search engines (like Google) to locate your website.
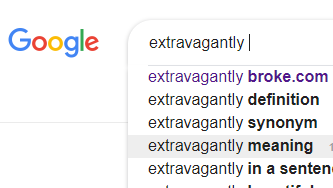
Here’s an example of a domain name search for my website ExtravagantlyBroke.com.
Now if you’re wondering what is a URL? Well, that is the specific web address that links directly to your website.
For Example:
- Domain name = ExtravagantlyBroke.com
- URL = https://ExtravagantlyBroke.com
And when selecting your domain name, it’s a good idea to choose something that is clear and not overly clever.
For instance, Michelle Schroeder-Gardner has a hugely popular website.
And although her title MakingSenseofCents is clever, she admits it gets confusing. Because some people have trouble understanding “sense and cents.”
Another example is the site Twinsmommy.com. I love this site!
But just looking at the name makes me think of a blog about a mom and her life caring for her twins. Which has nothing to do with me!
When in actuality, the site is about helping moms become mompreneurs. Which has everything to do with me!
But I never would have guessed that based on the domain name! In fact, I actually only stumbled across that website by accident.
And when you’re a newbie blogger, you may want to choose something that gives a clear message of what your blog is about.
You don’t want your blog success to be determined by the hope that people will accidentally stumble across your website.
Check out these examples, Allrecipes.com or Everydayhealth.com. There’s no mistaking what these blogs are about, right?
Now that doesn’t mean that you can’t pick something fun or be clever. Just keep your readers in mind and look at it from their perspective.
For my domain name, I feel that Extravagantly Broke appeals to readers who live above their means.
So it’s a good idea to try to pick a name that’s:
- Easy to remember.
- Easy to spell.
- Short, or not too wordy.
- And that relates to what you want to write about.
Here are some terrific methods to help you select the perfect name for your blog:
- Name your audience. For Example, SmartBlogger.com teaches bloggers smart ways to grow their blogs.
- Name the topic. For example, PennyPinchinMom.com teaches moms lots of ways to save money.
- Name the benefit. For example, IWillTeachYouToBeRich.com provides the benefit of teaching readers smart ways to be rich.
Do A Domain Name Search
Be sure to brainstorm at least 10 names.
You can do this by writing down lots of words or phrases that relate to your topic.
Then try different combinations of those words to try and make a name. Or you could take an already popular phrase and swap out some words with your own.
For instance, “The Golden Rule.” If your site is about fashion design, you might call it, “The Golden Spool.” That’s was just a quirky example off the top of my head!
And as it turns out, that’s an actual website. But anyway, you get the point!
After you’re done brainstorming, you can use a website like Namecheap to check the domain name availability.
Here’s an example:

Type in your name choice and the next screen will show you the status of that particular domain name.
For instance, if you type in ExtravagantlyBroke.com, it shows an “x” and that the domain name is already taken.
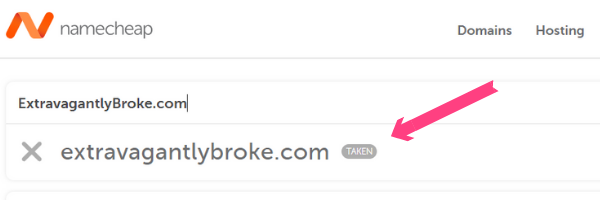
But if your name choice is not taken, you will see a checkmark in front of the name.
You will also see all the available versions of that name that you can choose from such as .com, .net, .org, etc.

It’s best to end your domain name with .com if that option is available because it’s the most popular, and easy to remember.
And in case you were wondering…”yes,” domain names do cost money.
But the good news is, that I’ll show you how to get a free domain name when you sign up with Bluehost.
Now, please don’t stress over choosing the perfect domain name.
Just keep in mind that there are plenty of successful blogs that don’t have great names.
And if you’re unsure about your choices, then you can always test your ideas on friends and family, for feedback.
Then, once you find a domain name that is available, you’ll need to do a domain name registration so that no one else can use it.
We’ll get to that shortly, but first, you need to decide on a blogging platform.
3. Choose A Web Host And Blogging Platform
The Web Host is a service that provides a place for your blog to live on the internet.
Yes, it’s true. Your blog actually needs a home base! It’s not just roaming freely out there somewhere on the world wide web.
So try thinking of the web host as the landlord that owns the internet space where your blog will live.
Did you know that a blog
It may help to think of it as a theater (that you’re renting from the landlord) with a front stage and a backstage.
The blogging platform is like the backstage area of a broadway show. It’s where you do all the behind-the-scenes work on your blog happens such as building, writing, storing, and managing your content.
And the front stage is where you show off your finished product. Meaning the actual web page that your readers will see when they visit your website.
So when it comes to choosing a blogging platform, you can pick either a hosted format or a self-hosted format.
What’s the difference? I’ll explain:
- Hosted platforms like WordPress.COM:
- Don’t require you to pay for a web hosting service. But, you also DO NOT own the website or your content.
- You’ll have to include the hostname as part of your domain name or web address. So instead of yournewblogname.com, it will be something like — yournewblogname.wordpress.com.
- The host can also place distracting ads on your site, but you don’t make money from them.
- You won’t have the freedom to customize your website.
- Your site may look dull and unprofessional.
- And, your site can be turned off at any time if you violate their terms of service.
- Self-hosted platforms like WordPress.ORG:
- Provide you with total control over your website.
- Allow you to build and grow your blogging business
- Are great for monetizing.
- And you can customize the visually appealing website that you want.
The bottom line is, that self means you’re in control, and hosted means that someone else is in control.
So if you want to learn how to start a blog as a hobby, then a hosted site may work well for you.
But if you want to learn how to start a blog and make money, then a self-hosted website is definitely the best choice.
Which Blogging Platform Is The Best To Start A Blog And Make Money?
A key thing to know about how to start a blog and make money is which platform to choose.
There are many different hosted or self-hosted blogging platforms available.
Personally, I use WordPress.org (self-hosted). It is considered the most popular blogging platform. And it works perfectly with my web hosting service Bluehost (the landlord).
Just be sure not to confuse WordPress.org (self-hosted) with WordPress.com (hosted).
And even though WordPress.org (the blogging platform) is free to use, you will still have to pay for the web hosting service (the landlord). And for your domain name.
But don’t forget, I’ll show you how to get a free domain name with Bluehost.
Now granted, with WordPress.com (also a blogging platform) you don’t have to pay for a web hosting service. BUT remember, that you also don’t own control over your blog.
And this guide is for people who want to know how to start a blog and make money.
So let’s jump right in and get started creating your website.
4. Buy Hosting For Your Blog
I know what you’re probably thinking. That you don’t have a lot of money to spend on setting up a blog.
Perhaps you’re on a tight budget, or you’re already overwhelmed with bills and don’t want to add to the problem.
I know the feeling!
Well, guess what?
You don’t have to be afraid to buy hosting because I’ve got you covered!
When I was looking for an affordable solution for how to start a blog, I decided to use Bluehost (the landlord) as my web hosting service.
And it has worked out so great that I have even become an affiliate. In fact, it’s one ways that I monetize my website.
But even before I was an affiliate, I still couldn’t recommend them enough, and here’s why:
- They are the #1 recommended web hosting service by WordPress.org
- They won’t cost you an arm and a leg if you’re on a budget.
- You can start a blog for only $3.95 per month with a 36-month plan.
- You get a Free Domain Name when you buy at least a 12-month plan — which is only $5.95 per month. That’s about $72 per year. See, not bad!
- You get easy setup and access to WordPress.org with your package.
- Bluehost even offers a 30-day money-back guarantee if you’re not satisfied.
- And, Bluehost also provides 24/7 technical support via email, phone, or live chat. I’ve used the live chat a few times myself, and they are very helpful.
That’s why in my opinion they are the best choice.
Next comes the easy part! Setting up your very own website. And I’ll walk you through it step by step.
You can click my Bluehost link to get started.
And you’ll be directed to the homepage which looks like this:
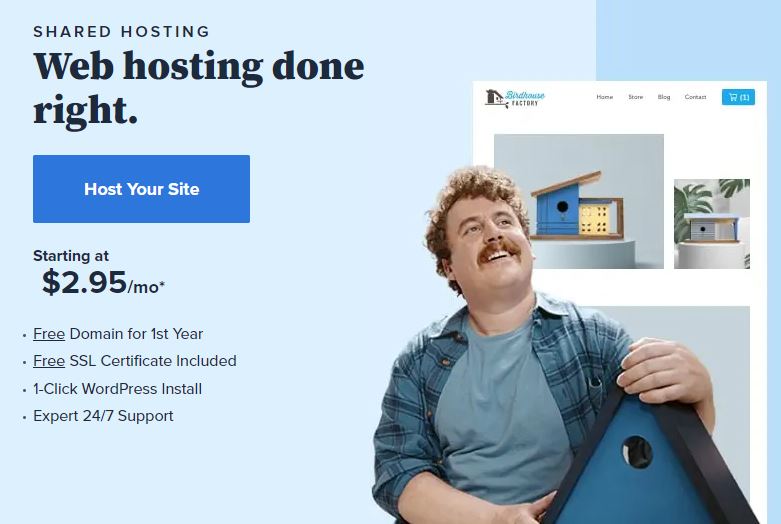
Next, click the blue “Host Your Site” button and you’re on your way!
You’ll be happy to know that Bluehost is one of the most trusted web hosting services available. And it is used by millions of bloggers worldwide.
Plus, signing up is super easy! Here’s how:
Step 1: Select A Bluehost package.
Bluehost offers 4 packages to choose from.
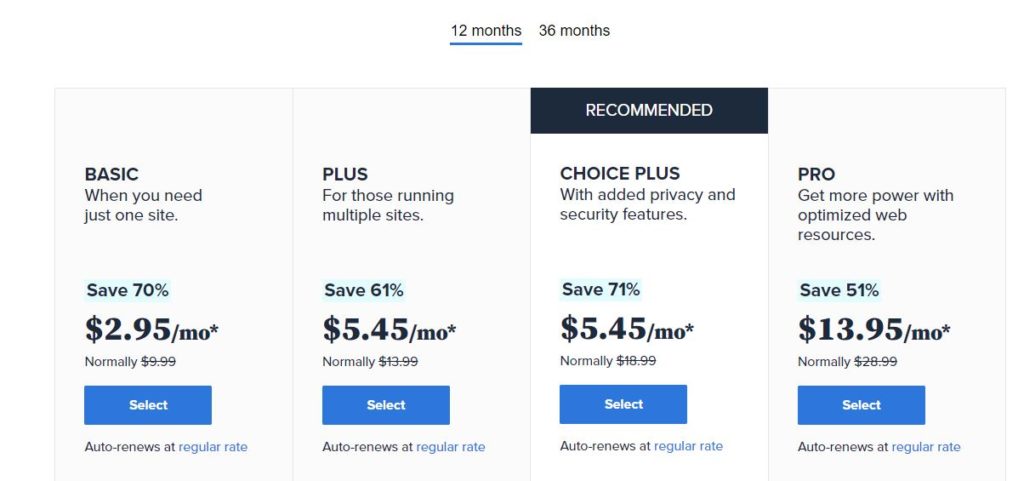
When choosing your package, keep in mind that you’ll get the access to additional security and privacy features when you sign up for 36-months.
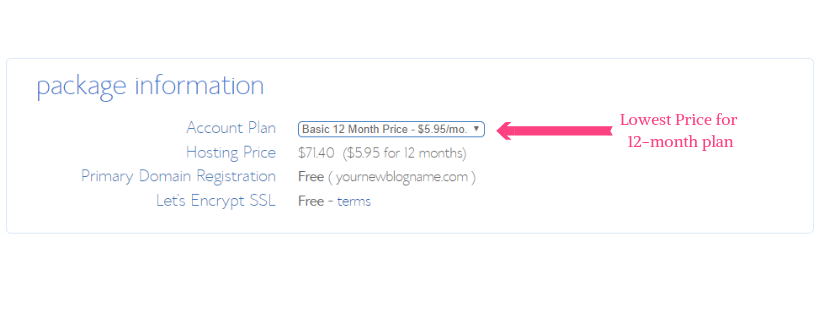
However, if you’re on a tight budget or just looking to test the waters, you can’t go wrong with choosing the Basic 12-month package.
As you can see, it’s very affordable at only $2.95 per month, and you always have the option to upgrade later.
But most of all, try to avoid a month-to-month plan because there are too many downsides, such as:
- No free domain name.
- You’ll pay a higher cost per month.
- You run the risk of your website expiring if you forget to renew each month.
- And you could potentially lose business.
So as you can see, the more years you sign up for, the less you pay overall.
But from a mindset perspective, choosing at least a 12-month plan shows commitment.
And, that you are ready to give your blogging career a fighting chance.
So just click Select on your preferred package choice to go to the next screen.
Step 2: Domain Name Registration
Now, this is where you will enter the domain name that you choose earlier.
And once you complete this domain name registration, then no one else can use it for as long as you have your Bluehost account.
You’ll see these 2 options.

For New Domain: To get your free domain name, enter your choice in this box and click Next.
For I have a Domain Name: If you’ve previously purchased a domain name then enter it in this box and click Next.
- With this option, you will need to log into the Account Manager page of your domain name provider. Then you must follow their specific instruction on how to add your domain name to your Bluehost account.
Step 3: Set-up Account Information And Package Options
Here is where you will create your account by entering your information.
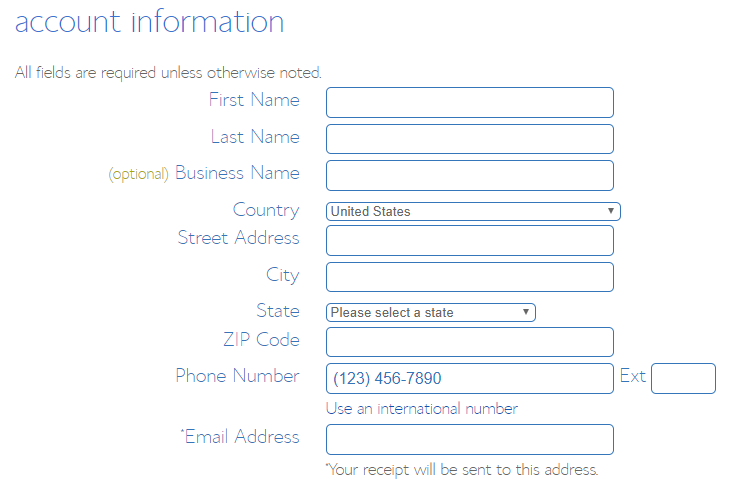
After you enter your information, then you will select your package options.
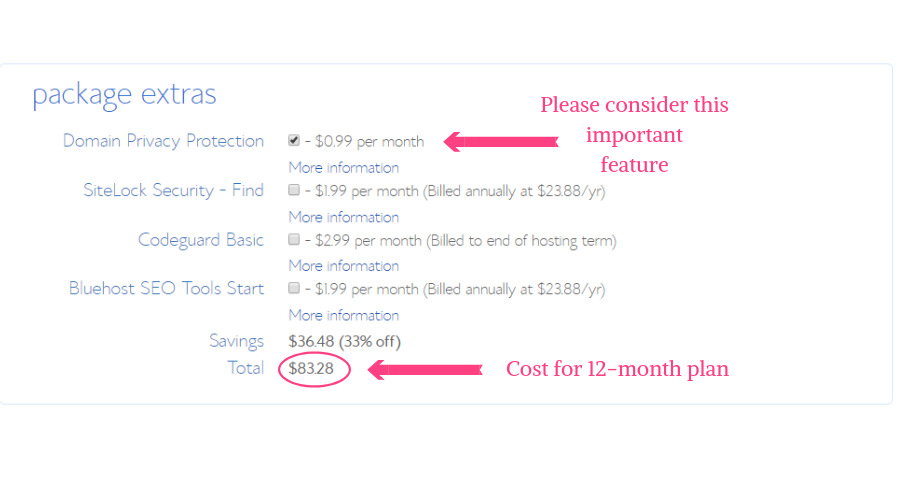
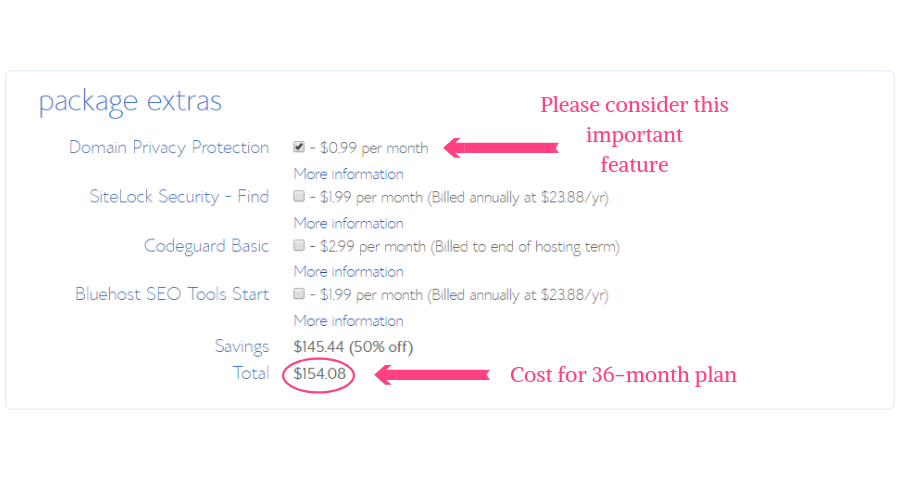
For the Package Extras option, please consider getting the Domain Privacy Protection.
It’s only an additional 0.99 per month, and it’s worth it to ensure that your contact information stays safe.
All the other options are not necessary.
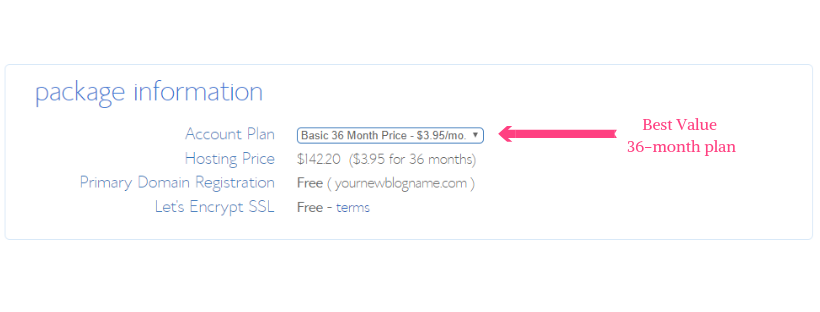
Like I said earlier, if you are able to afford a little extra, you’ll get the best value with a 36-month plan.
On top of that, you won’t have to worry about renewing or about the price increasing for at least 3 years.
Step 4: Payment Information
Okay, it’s time to purchase your website by completing the payment information.

Once you’ve entered your payment, then click submit.
Now it’s time to install WordPress as your blogging platform (the backstage of your theater).
But don’t worry, because Bluehost makes this step ridiculously easy.
Step 5: How To Install WordPress
At this point, you will be prompted to create a password.

Click the green button and create a password.

After you create a password, you should take a few minutes to read through the privacy policy and terms.
Then once you’re done, check the box if you agree and click Next.
Bluehost will automatically begin to install WordPress and add it to your account.

One-click, that’s all! See, I told you it was ridiculously easy!
CONGRATULATIONS!
You now have your very own WordPress blog! Look at you go!
The only thing left to do is design your brand new website.
So go ahead and log in to your account.
Step 6: Choosing A Theme
Next, you’ll need to select a theme.
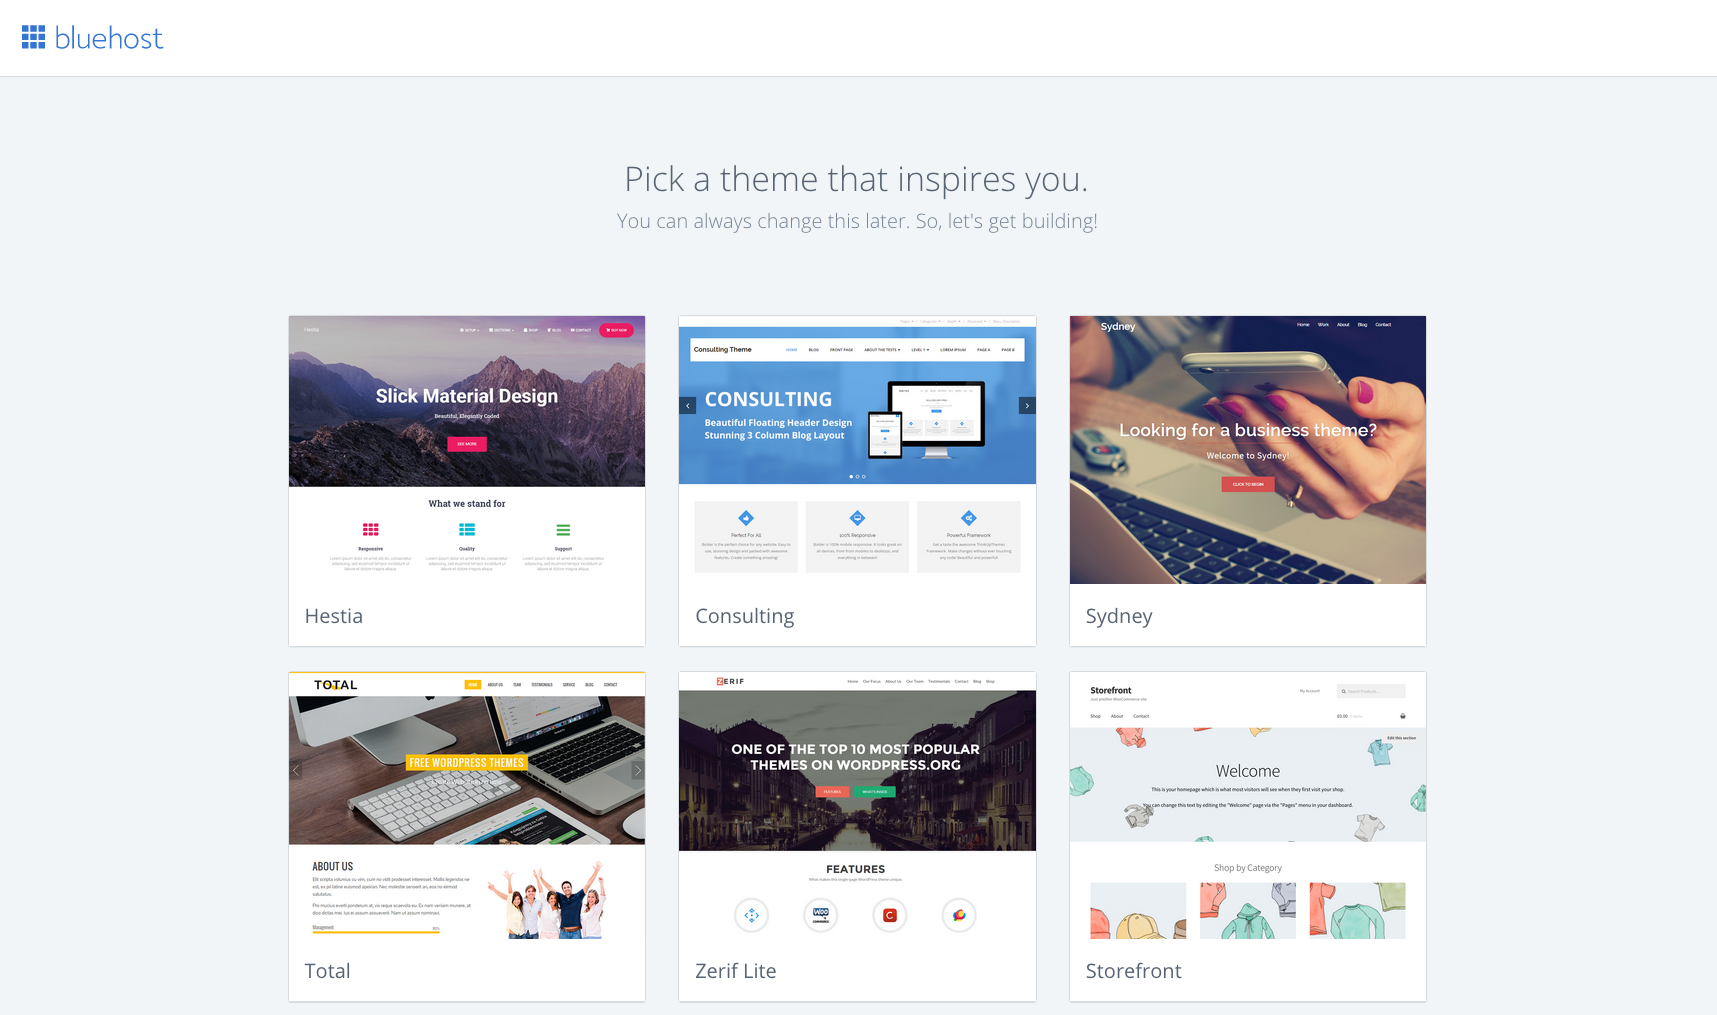
Choosing a blog theme is like decorating the set or front stage of your theater. This includes the layout, colors, font style and overall appearance of your blog.
WordPress has so many amazing free themes to choose from.
You can browse through all the themes and see what strikes your fancy. Or you can search themes based on your blog topic such as fashion, restaurant, or business.
Click on any theme that you’re interested in to find out more details about it.
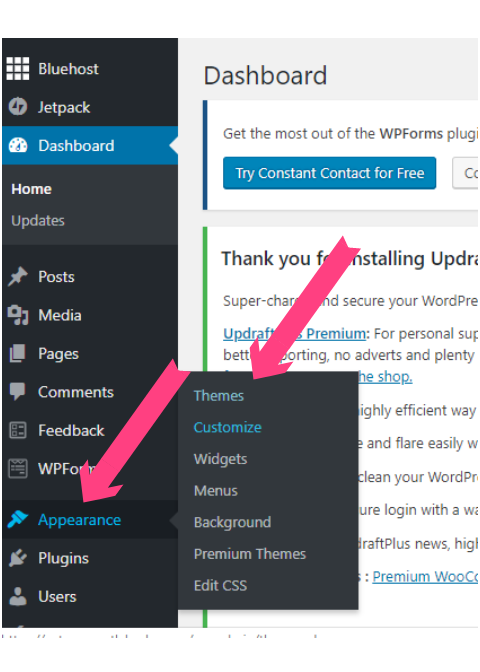
To access themes from your WordPress dashboard, click Appearance in the side panel. Then select themes.
Once you find the theme you like, then hover your mouse over it and select Install.
After installing a theme, then select Activate. That’s it!
Choosing a theme can be fun, and you can take your time searching through them.
But try not to get too hung up on choosing the perfect theme because you can always change it later.
I started by using a free theme as well. But as my blogging business grows I will eventually upgrade to a paid theme with even more features.
Remember, when you’re a beginning blogger it just needs to be good enough.
And of course, it is great to have a beautiful website. But ultimately, it’s your content that will attract and keep your audience.
You can check out this link if you would like to see a WordPress tutorial video for setting up your theme.
Then once you’ve activated your theme, you’ll receive this message.

From here just click on Start Building and you’ll be taken to your WordPress dashboard.

Next, you’ll be asked if your website will be for business or personal use.
This is so that Bluehost can make recommendations to help you during your website building journey.
But if you’re not interested, you can select “I don’t need help.”
And this is how your WordPress dashboard will look.

This is the back-end (or backstage) administrative part of your blog that I mentioned earlier. It’s where you will write your content before publishing.
Now keep in mind, that your site is not LIVE until you actually launch it.
You may want to write a few posts first and tweak your designs before officially launching your website.
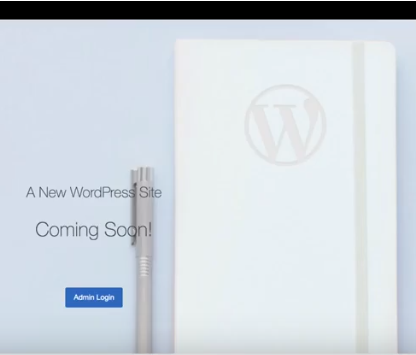
In the meantime, while you’re working on your website, an image similar to this is what shows on the internet if anyone searches for your domain name.
Your Blogging Login And BlueHost Login
There are 2 ways to log into your WordPress account.
1. By typing the URL (domain name) for your blog and adding /wp-admin. For example, yournewblogname.com/wp-admin.
This will take you directly to the blogging login for your WordPress account.
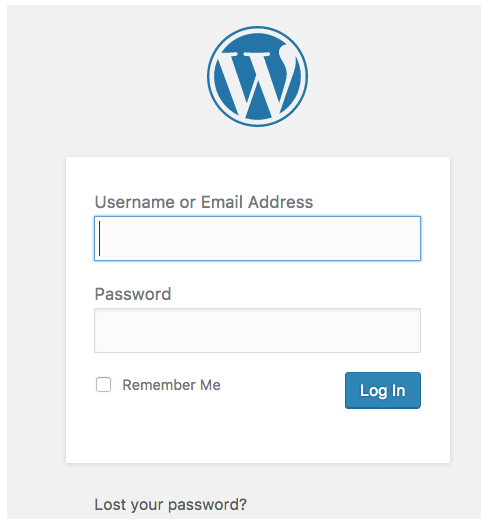
2. The second type of blogging login is through your Bluehost account.
To access your Bluehost account, simply go to Bluehost.com. Click the Bluehost login in the upper right corner.
Next, you’ll see the Bluehost login screen below.
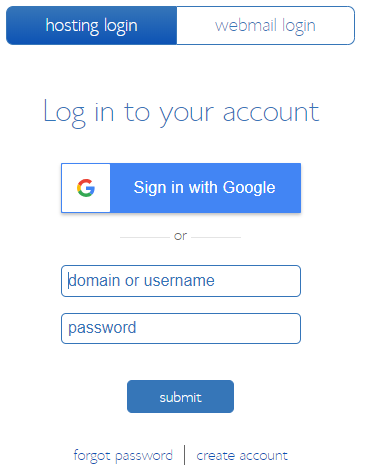
Enter your domain name, example, yournewblogname.com, and your password. Then click submit.
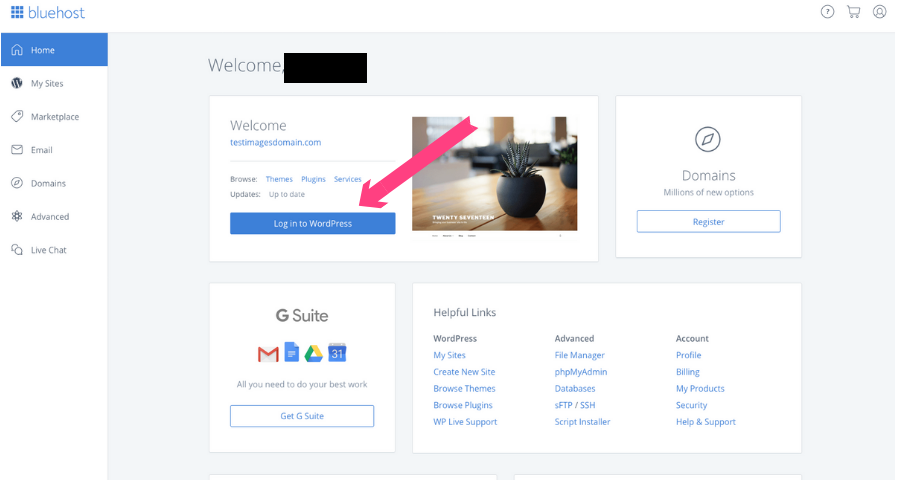
From the homepage simply click the Log in to WordPress, button. This automatically takes you to your WordPress dashboard.
Step 7: Time To Blog Your Heart Out
You’ve finally made it!
So to begin writing your first post, from the WordPress dashboard on the left sidebar, click Post. Then, click Add New.
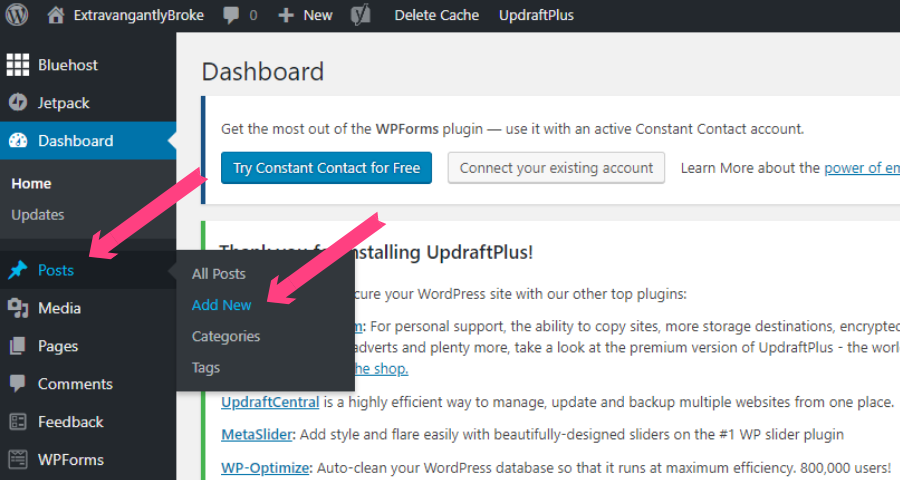
Next, add the title for your post and then go ahead and blog your little heart out!
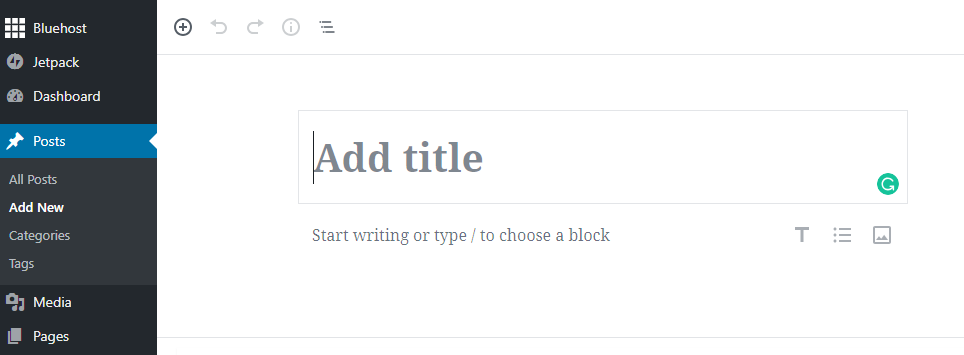
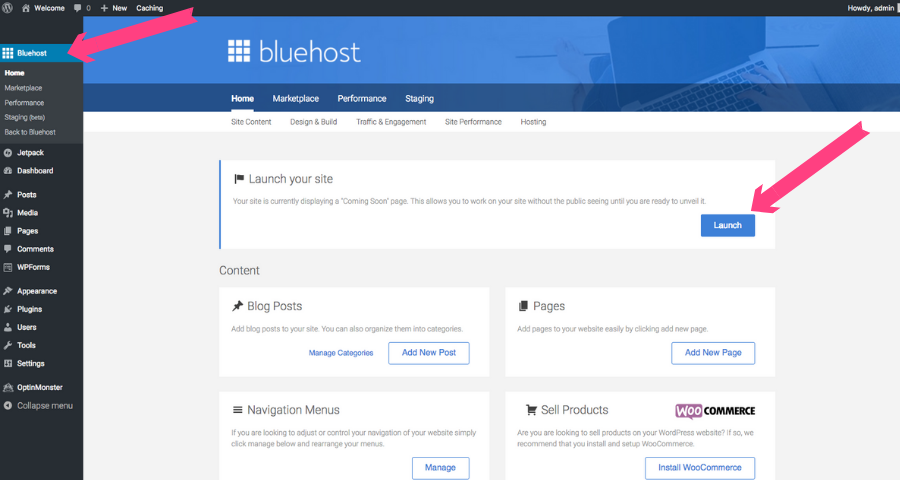
Once you’ve written your posts, and your website design is ready, then you’ll need to launch your website.
Just click the Bluehost icon to go to the home page. Next, click the Launch button.
HOORAY!
You did it!
Stick a fork in it Blogger, because, You-Are-Done!
Your new blog is ready for the world to enjoy. Give yourself a pat on the back!
But before you go…check out these great helpful resources.
WordPress Tutorials On Blogging For Beginners
Okay, you’ve learned how to start a blog the right way. And at the risk of sounding like an infomercial…But wait, there’s more!
I can’t let you leave without mentioning a few quick blogging for beginners resources to help smooth out your blogging journey.
If you’ve never used WordPress before, then you’re going to need a little bit more instruction on how it works.
Fortunately, Bluehost has you covered on that. To learn some blogging for beginners basic information on how to use your WordPress dashboard click here.
Another helpful blogging for beginners resource is wpbeginner.com. Here you can learn about all things WordPress.
It has been a very helpful resource for me. Just search for any WordPress-related topic that you have questions about.
You can search for the best plugins to use. And for information about SEO which are some things you’ll need to know as your blogging journey continues.
Also, be aware that WordPress now has 2 types of editing software for creating blog posts.
There’s the Classic version which uses one large text box for writing content. And the new Gutenberg version, which uses multiple smaller boxes to add content.
And just in case you’ve never used either, I’m including a link to some helpful WordPress tutorials about each. This information will definitely come in handy when creating your blog posts.
For help with the Classic Editor click here.
For help with the new Gutenberg Editor click here.
So there you have it! You’re all set!
All you need to do now is start cranking out those Amazing blog posts!
Now go show the world what you’re made of!
Happy blogging!
I would love to hear from you!
If you found this post to be helpful, I’d love to hear about it! Leave me a comment below and share your thoughts, results, or challenges with starting your blog.


Hi there, thanks SO much for this really informative blog post. It’s definitely given me much to think about.